Mines Map Strategy | World Of Tanks Blitz
Introduction
Overview
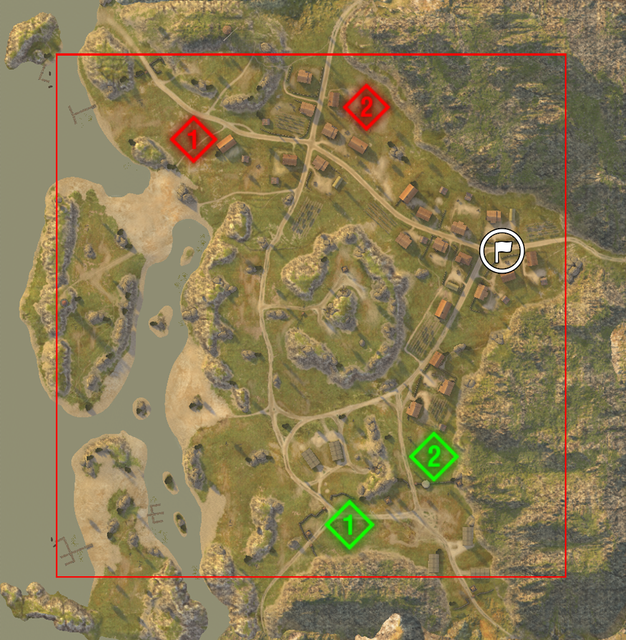
Mines is a small map. Most of the fighting occurs either near the cap circle in the town or at the entry point onto the mine (commonly referred to as the “hill”). These are the two main avenues where fighting occurs. Another avenue is the lighthouse, an area which has potential for being a sniping spot and a flank route.
Mines is a small map. Most of the fighting occurs either near the cap circle in the town or at the entry point onto the mine (commonly referred to as the “hill”). These are the two main avenues where fighting occurs. Another avenue is the lighthouse, an area which has potential for being a sniping spot and a flank route.
Climate \ Summer
Availability \ Tier I to Tier X
Size \ Small
Terrain Features:
- North
A spawn is situated here. Moving east, there is a small hill and a mill, a popular sniping spot. Ahead are mountains, which you can climb for fun in training rooms. Moving west, there is a small island called Lighthouse Island.
- South
A spawn is situated here. This area has somewhat more cover and seems more spacious. Moving east, again there are high mountains. A town is situated at the foothills. This town is an excellent place especially due to the cover it provides. Moving west, there are some potential sniping spots. There's another island, which may be called "Dark Island"... - East n West
As elaborated above; East is mountains, West is seas and islands.
- Da Center
A mine is situated at the middle of the map, referred to commonly as the "hill". This area is of utmost importance because of the fact that the main battle takes place here. Most of the times, it's either the hill, or defeat...
Learning from Mines
- Mines trains you in skills that can be applied elsewhere in
lifeWorld of Tanks Blitz... - Using the bushes n trees to your advantage by predicting movement and location; in addition to their importance as cover.
- Side scrapping and angling; when pushing for the hill or through the town.
- Going hull down; at the entrance of the hill.
- Usage and importance of frontal armor and gun elevation/depression.
- Aiming for the weak spots of the opposing tanks.
- The peek-a-boom strategy; applied when controlling the hill or town
- Finally... it teaches you that teamwork's necessitated for survival and victory.
Moving on...
The Strategy
- Light Tanks
Rush towards the hill. If there are more light tanks, a few should volunteer going to the lighthouse flank. Scouting is recommended for light tanks.
- Medium Tanks
Suited for all avenues. Rushing towards the hill is still a good idea. A few may head to the other flanks BUT only if there are no other tanks there, I highly recommend that you do not engage in one-on-one brawls. MTs are supporters, stay behind the heavies and cover, deal damage, get behind cover, repeat.
- Tank Destroyers
There are good sniping spots on either spawns. Hold one of those, it's better to choose one where you cannot easily be attacked from behind. Another tip, always keep eyes on the hill, as well as behind you. Second-line supporters; never, NEVER, go out on your own. Stay behind cover and deal damage. Hide in bushes or break em trees and use their foliage as cover.
- Heavy Tanks
Heavies have tons of options. Or... do they? Heavies with good depression and elevation angles may head over to the entrance of the hill, where they can go hull-down, blocking damage and dealing damage. Some may head over to the town and try capturing the base, but this should be carried out only if there are at least 3 heavy tanks on your side. Controlling the Lighthouse Island is pointless. One more tip, please don't camp in a heavy. I REPEAT, DO NOT CAMP IN A HEAVY!
Importance of Trees
In Mines, the trees matter; they may provide strategic advantages.
While heading towards the hill entrance, watch out for falling trees. They indicate enemy movement. However, they may also be used by enemies to fake movement. You can do the same! Ram a tree in the opposite direction you're going. Some cool dudez may shoot, giving away their location, and you pound em back... at least, if you can penetrate em.
Da Hill / Da Mine
Always get inside; guarding it's entrance from the inside will be a piece of cake given that you're inside. and leave you alone. If situation gets messy because of your teammates not joining you... jump and head over to your allies. If the hill is under enemy control, it's the right time to get to the town and capture the base.
Da Town
You may head over to the town early in game with backup. Controlling the town can be beneficial in the long run in some scenarios; especially if the enemies control the hill; in which case, your team should regroup at the town, which provides effective cover against the opposing snipers.
Da Lighthouse
Well, heavies that are great hull downerz may head over to the island. In case you're a TD, go if you got backup with ya. If the hill is captured, the lighthouse is a good place to retreat to, most of the times... unless... the enemies started capturing the base. So yeah, controlling the lighthouse in the earlier stages of the game is a better idea than controlling it in the ENDGAME.
- Lighthouse
- Hill
- Town
The Edited Mines Map

In this picture;
- The blue-dotted line is the flank-route for both teams.
- Blue highlighted area is the hill.
- Target signs indicate where each team should focus on, if the other team controls the hill.
- The area inside the white-dot line indicates hull-down area.
- The warning signs of course, warn both teams, about danger places.
- The two 'islands' can be used as sniping locations, they can easily be used to save hill entrance.
A Rather Disappointing Conclusion:
- The victory depends on your team, not just you.
- Unity in the team and strategic planning is the best way to win on this map... as in the other maps.
- This map isn't just 'control the hill' map, there must be tanks on all routes/flanks, to prevent defeat. So uh yeah...
- C ya.


Comments
Post a Comment